Showing posts with label recipe. Show all posts

April 22, 2022

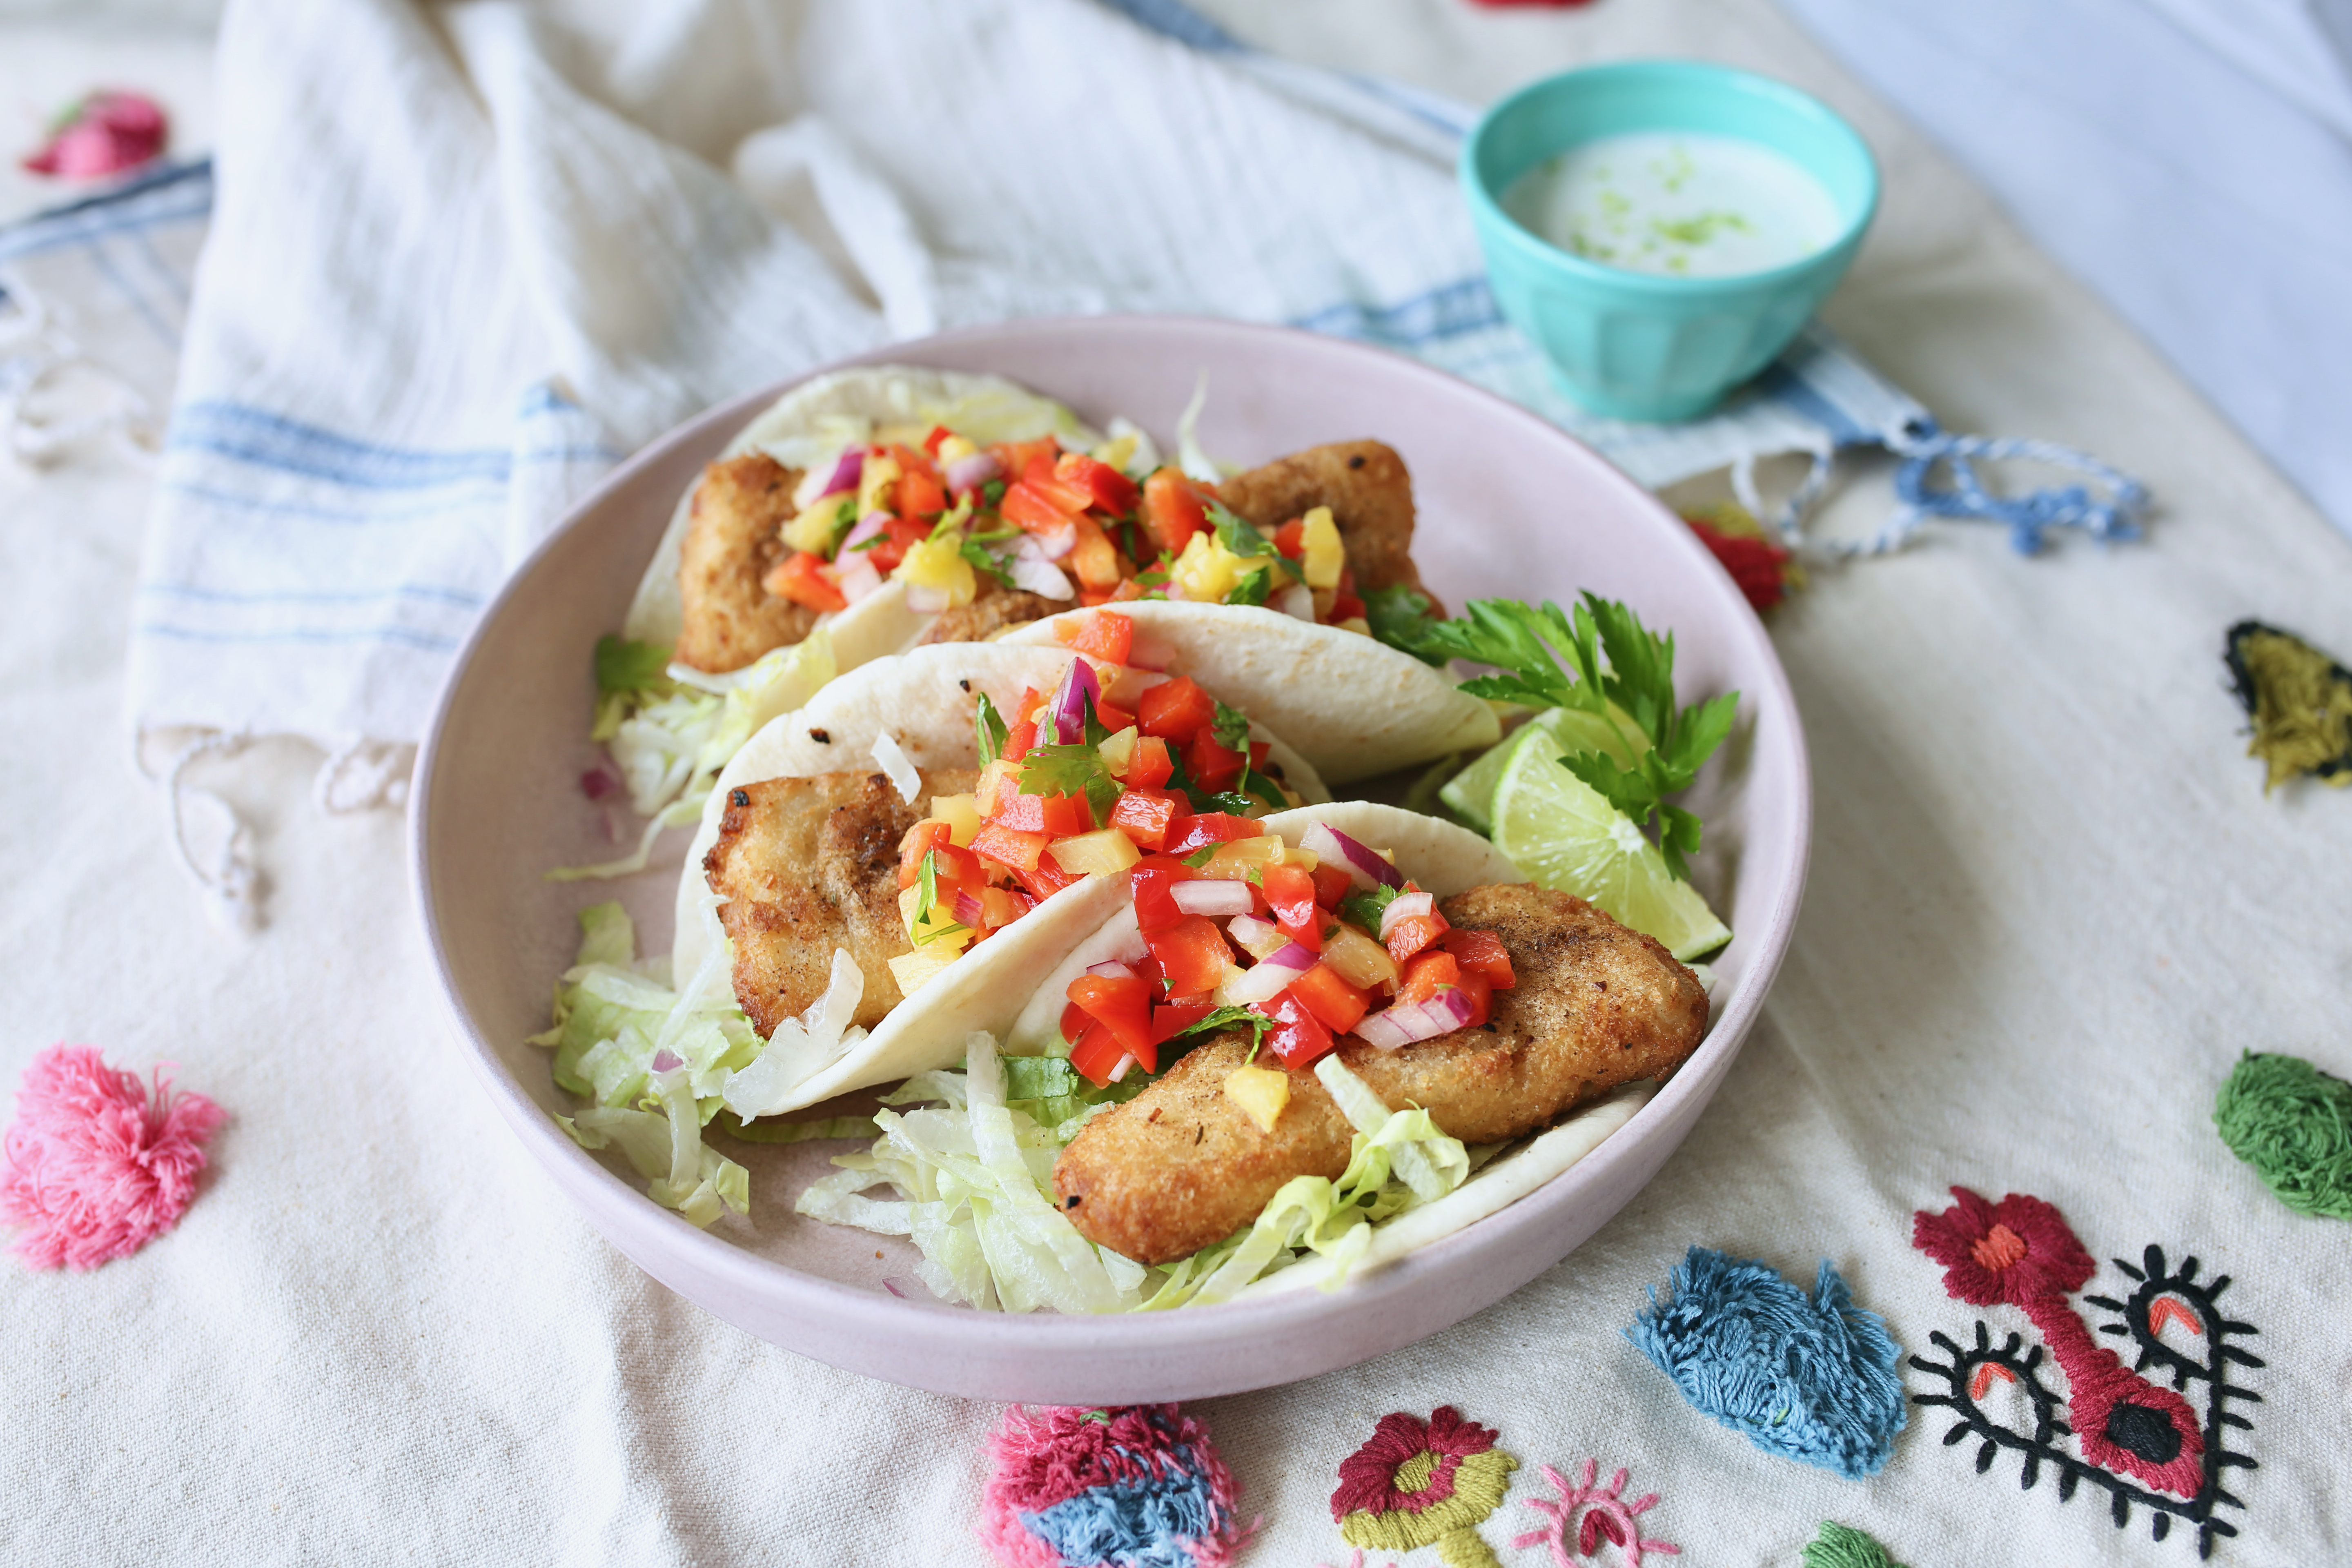
Jamaican Jerk Fish Tacos with Scotch Bonnet Pineapple Salsa


Last month I had the chance to check off a bucket list location when I visited Jamaica. I'm hoping to find time to share more about that trip in the near future, but I have to share about the food we ate there, especially the jerk chicken. I still dream about the jerk chicken we had there and crave it constantly. In order to fulfill these cravings, I've learned how to make jerk seasoning and have been making an air-fried version of jerk chicken. Absolutely delicious!

So when Gorton's Seafood reached out and asked me to create a recipe using their frozen fish, I already knew where my inspiration would come from. And let me tell you, this recipe is a new favorite of mine and I've made it twice since I first created it a few days ago!

The recipe is also so simple and quick. I hope you give it a try!


Jamaican Jerk Fish Tacos with Scotch Bonnet Pineapple Salsa


Ingredients:

-1 bag of Gorton's Seafood beer battered frozen fish

-Cooking oil spray

-Tortillas


Scotch bonnet pineapple salsa: 

-1 red bell peppers, diced

-1-2 scotch bonnet peppers, diced

-1/2 red onion, diced

-1/3 cup pineapple, diced

-1/4 cup cilantro, chopped

-3 Tsbp lime juice

-pinch of fine sea salt


Jamaican Jerk Seasoning:

-1 tsp onion powder

-1 tsp garlic powder

-1 tsp five spice

-1 tsp allspice

-1 tsp black pepper

-1/2 tsp thyme

-1/2 tsp nutmeg

-A pinch of salt


1. Mix all salsa ingredients together in a medium bowl

2. Mix all Jamaican Jerk seasoning together in a small bowl

3. Lightly spray both sides of frozen fish with cooking oil

4. Lightly season fish with Jerk seasoning

5. Air fry fish at 425°F for 15 minutes - flip fish halfway through.

6. Lightly warm tortillas, layer with shredded lettuce, fish & salsa.


Enjoy!

November 4, 2021

Vietnamese-Style Beer Battered Shrimp


Some of my favorite meals include two staple ingredients: Fish sauce and garlic. Anyone else with me?

I used to be scared of cooking with fish sauce because of the initial whiff you get when you open the bottle. But it tastes incredible and lends the most amazing umami flavor to dishes, and I've learned to love cooking with it. 


The other day, I was craving some Thai or Vietnamese food. I didn't have any protein ready to cook in my fridge, but I always have some Gorton's seafood in my freezer. So I made a quick sauce using only 4 ingredients and cooked up crispy, sticky and delicious shrimp using Gorton's Beer Battered Shrimp in under 20 minutes! 

I had some lettuce, carrots, leftover mung bean noodles and snap peas, cilantro and mint from my garden. So I created a salad to top with the shrimp for a full meal. But you can also eat the shrimp with rice and cooked veggies, or on its own!

Please let me know if you try this recipe and what you think!

Vietnamese-Style Beer Battered Shrimp

Serves 2-3 people

Ingredients:

  • 1 package of frozen Gorton's Beer Battered Shrimp
  • 2 Tbsp Fish sauce
  • 2 Tbsp brown sugar
  • 3 cloves of finely chopped garlic
  • 1 tsp black pepper
Instructions:
  1. Preheat oven to 425F
  2. In a small bowl, combine fish sauce, brown sugar, garlic and black pepper
  3. Lay out frozen shrimp in a single layer on baking sheet and cook for 12 minutes
  4. Place shrimp one by one in sauce and gently toss
  5. Place shrimp back on baking sheet and cook for 4-5 minutes
  6. Remove and enjoy!

March 5, 2021

Fish Po' Boy Sandwich


With the coming of Spring, I'm already dreaming of dining al fresco and seafood dinners. Unfortunately, in the Midwest there's likely still months before patios and rooftops open up (sans heaters), so I am still ordering takeout quite a bit. However, there are dishes that taste much better fresh than delivery or pickup. And since many are staying home more, it's a great opportunity for us to learn how to make recipes we usually just order from restaurants.

One dish I've recently made at home for the first time is a po' boy sandwich. I love a good po' boy, with its crunchy bread, crispy seafood, and delicious sauce, it never lets me down. And it's actually really simple to make at home as long as you have the right ingredients. The most important ingredient being the seafood!


I'm partnering with Gorton's Seafood again to create this fish po' boy sandwich. As I've shared before, I love their products and always keep them in my freezer. Their fish is wild caught and their whole fillet fish are flash-frozen at the peak of freshness. I love fish because it's a great source of protein and natural omega-3s. 


This po' boy sandwich is super simple to make! It is a new dish on rotation for mealtimes. The recipe I'm sharing is adapted from Serious Eats' recipe. And I hope you try it out for you and your family and let me know what you think!

FISH PO' BOY SANDWICH

Makes 4 sandwiches

Ingredients:

For the Fish:
  • 4 Gorton's Seafood frozen fish fillets (I used the Fish Sandwich Fillets)
  • 2 Tbsp cayenne pepper
  • 1 Tbsp smoked paprika
  • 1 tsp salt
  • 1 Tbsp ground black pepper
  • 1 tsp onion powder
  • 1 tsp garlic powder
For the Sauce:
  • 3/4 cup Kewpie mayonnaise (You can use any mayo)
  • 2 Tbsp drained prepared horseradish
  • 2 Tbsp Cholula hot sauce 
  • 1 Tbsp dijon mustard
  • 1 Tbsp lemon or lime juice
  • 2 garlic cloves, minced
  • Salt and pepper to taste
For the Sandwich:
  • 4 sub-style French rolls
  • 4 Gorton's Seafood frozen fish fillets (I used the Fish Sandwich Fillets)
  • 4 Lettuce leaves (I used Romaine lettuce)
  • 2 tomatoes sliced
  • 16 dill pickle chips
Instructions:
  1. Preheat oven to 425F.
  2. In a small bowl, combine cayenne pepper, paprika, salt, ground black pepper, onion powder and garlic powder.
  3. Lay out frozen fish fillets on half of baking sheet. Sprinkle above seasoning mixture over both sides of fish fillets.
  4. In a medium bowl, combine all sauce ingredients together.
  5. Open French rolls and place them on other half of baking sheet so they are open faced up.
  6. Place rolls and fillets in over. Set timer for 16-18 minutes. Flip fish fillets and remove rolls from oven halfway through.
  7. While fish finishes baking, start assembling sandwiches by placing a generous amount of sauce on open faced side of rolls.
  8. Layer lettuce, tomato slices and pickles on each sandwich. Once fish is done cooking, add one piece to each sandwich. (I cut each fillet in half to fit in the sandwich.)
  9. Enjoy!


January 17, 2021

Chicken Sausage Sheet Pan Dinner

Happy New Year! 

What a year it has been and we're only halfway through January! I know many of us are happy 2020 is over, but I know 2021 will have trials of its own. I hope we take everything we learned in 2020 into this year. For many, cooking is something you have learned when staying at home. It has brought me so much joy to see people grow more comfortable in the kitchen. I know I have had a lot of fun learning new recipes, creating new recipes and dabbling in different cuisines. 

With the new year comes new year resolutions. I'm sure many of you may have resolutions that involve eating healthier. It's always a goal of mine, especially given my line of work and what I expect of my patients. But I'll admit that I'm not the best at eating healthy especially during busy work weeks.

And sometimes it can be a pain to eat healthy food. Whether because it's too much work or it just doesn't taste delicious. This is why I love sheet pan meals. They're simple, quick, healthy and tasty!

What makes my sheet pan meals extra amazing is Al Fresco's Chicken Sausage. Their chicken sausage is fully cooked and comes in multiple flavors which makes them perfect for any cuisine you're in the mood for! It's why it's my go-to protein when I have a busy week and don't have time to meal prep. 

Just add whatever vegetables you have on hand and season however you want! You can serve over rice or eat it on its own.


CHICKEN SAUSAGE SHEET PAN MEAL

Serves 2-4 people

Ingredients:

  • 1 Package Al Fresco Chicken Dinner Sausage, sliced into 1/4 inch rounds
  • 4 cups of Chopped fresh vegetables (I used Zucchini and Yellow Squash)
  • 1 Chopped yellow onion
  • 3-4 cloves of garlic, finely chopped
  • 2 Tbsp cooking oil (I used avocado oil)
  • Black pepper to taste
  • Other seasoning to taste (I used Lemon Pepper and Smoke Paprika here)
Instructions:
  1. Preheat oven to 425F.
  2. Place dinner sausage, all vegetables and garlic on a large baking sheet pan.
  3. Drizzle cooking oil and sprinkle black pepper and other seasonings over sausage and vegetables.
  4. Mix everything with hands until well combined.
  5. Bake for 20 minutes on middle rack. Flip halfway.
  6. Enjoy!

September 25, 2020

Five Ingredient Friday: Pumpkin Chicken Sausage Pasta

When Al Fresco asked me to participate in a Five Ingredient Challenge using their fully cooked dinner chicken sausage, I knew I had to create a cozy pumpkin dish (I know, so basic!) to celebrate the start of Fall. And wow, I'm going to be making this dish all season, especially when I need a quick and easy weeknight meal!

It's not only the simplest recipe that uses ingredients you likely already have in your pantry and fridge, it's also so delicious, creamy and cheesy! Who knew a five ingredient recipe could be so flavorful! This recipe is also pretty adaptable to utilize whatever healthy ingredients you have on hand.

I used rotini pasta, since I always have rotini on hand, but you can use any kind of pasta for this recipe. You can also use different blends of shredded cheeses. And if you want to sneak in some greens, you can easily add them in! Plus, if you love spicy food like me, you can give it a kick of heat with crushed red pepper flakes.

Al Fresco's fully cooked dinner sausage is an ingredient I always keep on hand in my freezer or fridge. Not only do they have delicious flavors, they're easy additions to pasta, salad, pizza, breakfast scrambles etc. So far this recipe is my absolute favorite use of their chicken sausage! I really hope you give this a try and let me know what you think!

PUMPKIN CHICKEN SAUSAGE PASTA

Serves 3-4 people

Ingredients:

  • 1 package (16 oz) of Rotini Pasta, uncooked (You can use any kind of pasta you have on hand)
  • 4 Al Fresco fully cooked Sweet Italian Chicken Sausage links, slice into 1/4 inch thick rounds
  • 1 Tbsp olive oil
  • 12 oz canned pumpkin puree
  • 1 cup fat free half and half
  • 1/2 cup shredded cheese (You can use any blend of Monterey Jack, mild cheddar, mozzarella, and/or parmesan)
  • 1/2 tsp garlic powder
  • Optional: Spinach or any kind of greens you have on hand (ex: broccoli, asparagus)
  • Optional: Crushed red pepper flakes, to taste, for a spicy kick

Instructions:

  1. Cook pasta per directions on the box. Once cooked, drain, run under cold water so pasta doesn't stick and set aside
  2. In a non-stick pan or skillet, heat olive oil on medium heat. Once oil is glistening, add chicken sausage rounds and cook for about 5 minutes. Occasionally stirring so both sides of rounds brown.
  3. Once sausage is browned, add pumpkin puree, half and half, cheese, garlic powder and optional crushed red pepper flakes and greens. Stir and cook until heated through. 
  4. Add drained pasta to pan and combine.
  5. Enjoy!

#5withalfresco #ad

August 31, 2020

Sweet & Spicy Popcorn Shrimp Dinner


Meal prep. Anyone consider themselves adept at meal prepping? If you do, please send me your tips my way! I wish I was good at planning my meals for the week, then grocery shop with those specific meals in mind and never having to feel the panic of not knowing what meal I was going to make for work the next day. But, I've learned to make sure I shop for a variety of vegetables and protein. Some fresh and some frozen or canned, so I have a variety of food to work with when I cook last minute.

My go-to last minute meals are sheet pan meals. I love that they require very little prep, leave only a few dishes and utensils to wash and are simple and quick. 

I'm excited to partner with Gorton's Seafood again to share a sheet pan meal using their delicious popcorn shrimp! As I mentioned in my Shrimp Tacos recipe post, Gorton's Popcorn Shrimp is preserved for freshness, non-GMO and full of good protein, vitamins and minerals. I try to always have their popcorn shrimp in my freezer since it's so easy to create a variety of delicious snack or mealtime recipes with it!


This sweet and spicy popcorn shrimp sheet pan meal is simple and full of flavor! I love serving it over rice, but you can serve it over plain noodles or by itself. It's a great recipe for dinner parties or for everyday meals. And leftovers can be packed up for work the next couple days! You can swap out the vegetables for anything else too (snap peas, asparagus, etc). Let me know what you think of the recipe if you give it a try!

SWEET & SPICY POPCORN SHRIMP

Serves 3-4 people

Ingredients:
  • Gorton's Popcorn Shrimp (I used about 3/4 of a package)
  • 1 head of broccoli cut into florets
  • 1 head of cauliflower cut into florets
  • 2 cloves of garlic, minced
  • 1 cup sweet Thai chili sauce
  • 2 Tbsp Sriracha
  • 1 Tbsp honey
  • 2 Tbsp olive oil (or spray cooking oil)
Directions:
  1. Preheat oven to 425F
  2. In a small bowl, mix garlic, sweet Thai chili sauce, Sriracha and honey until well combined.
  3. Spread out vegetables on a baking sheet. Drizzle olive oil over vegetables. Toss to coat.
  4. Add Gorton's Popcorn Shrimp to baking sheet. Drizzle sweet and spicy sauce over shrimp and vegetables. Toss to coat.
  5. Bake for 20 minutes. Tips of florets should be browned.
  6. Enjoy!

August 9, 2020

SHRIMP TACOS

Happy August! It's wild to think that we are about to face month SIX of quarantine. If I had to quickly sum up each month, this is what I'd say.

Month one - two: As I'm sure was the case for everyone, the start of quarantine was rough. I thought time would pass by really slowly. 

Month three: I felt like I was getting into a rhythm. But then everything kept changing as we stepped through each phase.

Month four - five: Life got crazy as people were adjusting to the "new normal" and cases of COVID kept climbing.

We will see what month six brings! But one thing that remained the same throughout quarantine life was how much more cooking I was able to do. And my love for tacos and seafood never waned.

I've made many variations of tacos throughout this season, and the newest variation is one of my favorites because it incorporates shrimp. I'm excited to collaborate with Gorton's Shrimp since their products are delicious. Plus, they are often a freezer staple in my house because they make food prep super simple!*

Gorton's shrimp is great to keep in your freezer since it's preserved for freshness. I can easily cook up a smaller portion of the package for a snack or a larger portion for a shared meal. Lately I've also been focusing on eating foods that are filled with goodness. Gorton's Shrimp is filled with protein, vitamins and minerals for immunity boosting. Plus, it's non-GMO!

This shrimp taco recipe is perfect on a summer day! It's topped with mango salsa and sriracha sauce for a sweet and spicy kick.

SHRIMP TACOS:

Serves 2 people

Ingredients:

  • Flour/Corn tortillas
  • 1 cup shredded cabbage/lettuce
  • 1/2 cup diced tomatoes
  • 1/4 cup diced mango
  • 1/4 small red onion, diced
  • 1 jalapeño, diced into small pieces
  • Lime juice
  • Small bunch of cilantro, minced
  • 1 ripe avocado, sliced/diced
  • Gorton's Popcorn Shrimp
  • 1/4 cup sour cream
  • 1 Tbsp Sriracha
Directions:
  1. Prepare Gorton's Popcorn Shrimp as directed on package.
  2. In a small bowl, make salsa by combining tomatoes, mango, red onion, jalapeño, cilantro and lime juice.
  3. In another small bowl, make Sriracha sauce by combining sour cream and Sriracha.
  4. Warm tortillas over the stove until browned.
  5. Top tortillas with cabbage/lettuce, salsa, avocados, as much shrimp as desired, then drizzle on Sriracha sauce. 
  6. Add a squeeze of lime and enjoy!
Let me know what you think of this recipe if you try it!
*Sponsored by: Gorton's Shrimp

January 26, 2015

KITCHEN STORY: WINTER WHITE CHOCOLATE CRANBERRY OATMEAL COOKIES


Winter is in full force and I have found myself finding comfort in whipping up cookies in my kitchen as a coping method from the outside chill. Plus, it's a way of drawing people to your home as these cookies did last night with my small group ladies! It really works ;-)

I had some leftover dried cranberries & white chocolate chips laying around and figured I would make some simple but delicious white chocolate cranberry cookies! It's seriously a super easy recipe and a crowd pleaser!

Before we get to the recipe, don't forget to enter the AMAZON GIVEAWAY!! It ends 1/30/15 and is open internationally! Don't forget to enter daily for extra chances to win! Good luck! :)


INGREDIENTS
1 cup all-purpose flour
1/2 teaspoon baking soda
1/2 teaspoon salt
1 cup rolled oats
1/3 cup packed light brown sugar
1/3 cup white sugar
1 egg
1 egg white
1/2 cup softened butter
1 tsp vanilla
1/2 cup dried cranberries
1/2 cup white chocolate chips

Preheat oven to 350degF. Prepare a cookie sheet with aluminum foil.

Soak dried cranberries in a bowl of warm water for 5-10 minutes. Drain water and set cranberries aside.

In a large mixing bowl whip eggs, softened butter and vanilla together until fluffy.

In a medium mixing bowl combine flour, baking soda, salt, oats, brown sugar, white sugar, cranberries and white chocolate chips. Slowly combine dry mixture with the eggs, butter and vanilla mixture until well incorporated.

Drop tablespoon sized dough onto prepared sheet. Bake for 8-10 minutes or until edges are golden brown.

Let the cookies cool and enjoy with a cup of skim milk!


Tree Trunk Cutting Board: TJ Maxx (Similar | Similar)
Glass: C Wonder (Similar)
An encouraging quote to start your week off..."To achieve a goal you've never achieved before, you must do things you've never done before." (Sean Covey) WOW! I don't know about you, but when I heard that this past weekend, I became so motivated to do so much more! I hope you all are dreaming up big goals and that this week you'll do something new!

Linking up with:

November 22, 2014

KITCHEN STORY: SIMPLE THANKSGIVING RECIPE ROUNDUP


Happy Thanksgiving week friends!! Who else is as excited as I am for Thanksgiving?? It's one of my favorite holidays mainly because we get to gather with the ones we love, remember all that we are thankful for and have an excuse to eat as much as we want. But does anyone else hit a road block while deciding what to make for a holiday gathering? I often do, especially when I want to make something that everyone will love and won't be a repeat of what others bring.

Thankfully, I have compiled a list of some of my best recipes sure to please your guests or your hosts! Most of them are not your typical Thanksgiving feast dishes AND the best part is that they are so simple! Hope this helps or at least gives you some ideas! I also love hearing from you if you try out a recipe, so be sure to share how it turns out below! :)

MORNING RISERS:


SOMETHING SAVORY:


SWOON-WORTHY DESSERTS:


Have a Happy Thanksgiving friends!! I am so incredibly thankful for you!! I hope you get the chance to be with the ones you love this year!

Linking up with:

October 8, 2014

KITCHEN STORY: BAKED APPLE CIDER DONUTS


Fall is here. And while I can stomp my feet & pout all I want like a terrible two (or three) that Summer has come and gone, it will not make Summer come back. So I've decided to embrace the colder weather and find joy in the things that make Fall enjoyable. That means indulging on anything containing apple or pumpkin.

For myself, Fall rings in the time to drink a hot cup of apple cider. Yum! I love drinking hot apple cider while spending quality time with the school books & I always add some Biltmore Wassail Spice Blend to the drink. It's so delicious & really adds to the yummy flavor of Fall.

I went to my local grocery store in search of some apple cider and came across some made with Honeycrisp apples. I have to admit, I'm not on the Honeycrisp apple bandwagon. Most of my friends rave about it, but I'm more of a Fuji or Gala girl. To each their own! But I decided to give this cider a chance. It was so yummy and I immediately was reminded of the delicious cider & donuts I had inhaled during my college years at Michigan. (Cider Mill donuts anyone?)

That was it. I had to make myself some donuts! So I went back to my simple & basic Baked Cinnamon Sugar Buttermilk Donut recipe, tweaked it a bit and what happened were apple cider donuts!! Mmm...the taste of Fall...

Ingredients:
Donut:
1 and 1/4 cups apple cider
1 Tbsp Biltmore Wassail Spice Blend or any other spice blend (optional)
2 cups flour
1/4 cup white sugar
1/2 cup brown sugar
1 tsp baking powder
1 tsp baking soda
1 tsp cinnamon
1 tsp nutmeg
1/2 tsp salt
1 egg
3/4 cups milk
2 Tbsp butter, melted
2 tsp vanilla

Topping:
1/4 cup (1/2 stick) butter, melted
1/4 cup sugar
1/2 cup brown sugar
2 Tbsp cinnamon


Preheat the oven to 350 degF with the donut pan in the oven.

In a small saucepan, boil down the apple cider for 15-20 minutes. Pour 1/2 cup of the cider into the measuring cup and chill in the refrigerator.

In a mixing bowl, combine flour, white sugar, brown sugar, baking powder, baking soda, cinnamon, nutmeg, and salt together. Add the egg, milk, butter and vanilla and mix with a fork.

Once the apple cider is at least at room temperature or cooler, add it to the mixture. Mix the ingredients well. The consistency will be like pancake batter. Pour the batter into a large Ziploc bag or into a large piping bag.

Carefully remove the donut pan from the oven and spray the pan with cooking spray. If you're using a Ziploc bag, cut off a small bottom corner and pipe the batter to fill the donut pan 3/4 full.

Bake for 10 minutes. Remove the donuts from the pan and let them cool completely.

Mix together the white and brown sugars and cinnamon in a small bowl. Brush melted butter on the donuts and quickly dip the donuts in the cinnamon sugar mixture.


How delicious do these look? I promise they will be gone in an instant if you share them with friends and family! For the best taste, serve fresh the same day the donuts are made. Enjoy friends! Happy Fall!

PS. DON'T FORGET TO ENTER THE J.CREW $250 GIVEAWAY!! It ends 10/17! Enter daily for extra entries and more chances to win!!

August 11, 2014

KITCHEN STORY: BAKED BLUEBERRY LEMON DONUTS


One of the best parts of summer is berry season. I have so many great memories of going berry picking with my family and friends. My parents would tell this story to everyone of one time, when I was little, we went berry picking and my clothes and face ended up covered in berry juice after we finished picking. People joked that they should've weighed me before and after since I probably ate more than I picked! Good thing I was cute enough to get away with it!

Anyway, I wanted to bring a treat for my friends' house warming party and it was such a beautiful Chicago summer day so I decided to make something light. For some reason, lemons come to mind when I want something light. Then I thought I'd add blueberries to the mix since I had some in the fridge. And then these baked donuts came to be!

July 3, 2014

KITCHEN STORY: BROCCOLI SALAD


Whenever the holidays roll around, I'm usually in charge of preparing this broccoli salad. From my very first bite ever of this salad, I knew it would become a regular in my Holiday meal repertoire. Each bite is insanely flavorful and delicious. The dressing is what marries the ingredients so perfectly together with its tangy sweetness.

June 26, 2014

KITCHEN STORY: NUTELLA SWIRL CUPCAKES


Lately I have been back to being a Nutella nut. I put it on everything or just have sudden cravings to eat a spoonful (or two...or more...). I was set loose on the Speculoos (cookie butter) obsession last year so Nutella was on the back-burner, but now it has returned to the forefront of my consuming thoughts. (Oh, so witty.)

One morning while making simple vanilla cupcakes for my friends' birthdays, I was craving another spoonful of Nutella. And while licking the spoon clean I thought, "if I'm craving Nutella so much, then my friends must be craving it too." (Obviously. Because that is how everything in life works.) So I thought I'd dress up the plain cupcakes with Nutella and these came to life. Honestly, I thought these turned out looking ugly since I haphazardly piped the Nutella on top in a rush. But I guess someone's ugly is someone else's beautiful since my sister saw them and wouldn't let me frost them. I'm glad she said so since now I can see the beauty in their imperfection.

Ingredients: Makes 18-24 cupcakes (adapted from Spoonful)
2.5 cups all purpose flour
2 cups white sugar
1 (3.4 oz) package of instant vanilla pudding mix
1 cup milk
1/2 cup vegetable oil
4 eggs
2 tsp baking powder
1 tsp vanilla
1/2 cup Nutella (put in Ziploc bag or pastry bag)

Preheat oven to 350 F. Line regular cupcake pan with liners or grease cupcake pan.

In a large mixing bowl, combine sugar and eggs together with electric mixer (or if you are too lazy to clean a mixer, like me, use a fork to mix). Add the flour, vanilla pudding, milk, oil, baking powder and vanilla and mix until all ingredients are well incorporated.

Fill cupcake liners or pan until two-thirds full.

Microwave Nutella in Ziploc/pastry bag for 10 seconds, cut off a small corner/tip with scissors. Pipe swirls or any design on top of each cupcake. Carefully tap cupcake pans against the countertop a few times to let the Nutella settle slightly in the batter.

Bake for 18 minutes or until tops are a light golden brown and bounce back to touch.


Buon appetito my fellow Nutella lovers! Hope you enjoy this recipe & leave comments if you have any questions.


February 16, 2014

Kitchen Story: Peanut Butter Blossoms


Hope you all had a wonderful Valentines Day & weekend! My 24 hour surgery call Valentines date was not ideal, but I got a glimpse of the misery patients go through with having to spend a special day cooped up in a hospital room. And contrary to my teammates' wishes, I did not meet my valentine when we were consulted by the ED. The only contenders were elderly men...sadly all taken. Oh well!

Since I knew I'd need a sweet pick-me-up to get me through call, I decided to whip up a batch of peanut butter chocolate candy cookies. Peanut butter anything makes this girl happy. And since I was making them, I thought I'd make a double batch to share with my colleagues.

January 23, 2014

Kitchen Story: Pineapple Guacamole


My new obsession is creating different guacamole recipes by adding whatever ingredients residing in my fridge or pantry. It's a simple & healthy way to snack and get rid of those random leftover ingredients.

November 19, 2013

Kitchen Story: Simple Chocolate Chip Pumpkin Muffins


I have finally had a moment to breathe and attempt a few Fall recipes just in time for Thanksgiving! Who else is as excited as me for the excuses we have to stuff our faces this time of year? Specifically, stuffing our faces with Fall flavors. One of my favorites is pumpkin. PSL anyone? If you aren't up to speed on Starbucks lingo, that stands for the pumpkin spice latte. Yum.

I came across this recipe and had to make them! They are so delicious, quick, simple & perfect to serve at parties, church, etc.

And while I say this recipe is quick, it really is, but be careful and read the labels on your spices or else you might be adding a few tablespoons ground black pepper to your batter instead of cinnamon...oops! (I scraped off the top layer of the batter and lost a couple muffins.) This is why early morning baking is not for me. If you don't make a similar mistake as mine, these will be delicious & will disappear in no time!

November 8, 2013

Life Story: Fall Friday

Fall is all around! I must say, it's one of my favorite seasons, but I was trying to figure out why, so I came up with a list of my five favorite things about Fall. Which fits perfectly with my usual Friday linkup with Lauren for High Five for Friday!

1. Fall leaves
This picture of the alley behind my house is all I need to say.

October 29, 2013

Kitchen Story: Banana Pudding


When I have parties I've been serving dishes out of mixing bowls (the scratched up metal ones). Not classy. So I decided it's about time I invest in a nice serving bowl. I ran to Target thinking I'd be spending about $20-$30, but I scored a beautiful glass bowl from Target for only $7.99! My favorite part is that the bowl is wide at the bottom so I can use to not only serve salads or pastas, but also pretty layered desserts.

So this is where the banana pudding comes along. It's always been one of my favorite desserts, to eat and make. No baking or cooking necessary! Plus it's always fun finding new ways to present the dish. I hope you try this recipe & have fun decorating it!

Banana Pudding Recipe (adapted from AllRecipes)

Ingredients:
1 8oz package of low fat cream cheese, softened
1 (5oz) package of instant vanilla pudding
3 cups cold skim milk
1 tsp vanilla extract
1 (8oz) tub of cool whip, thawed
1/2 (12oz) package of vanilla wafers or chessmen cookies
4 bananas, sliced (optional: soak in 4 Tbsp concentrated lemon juice + 1 cup cold water to avoid browning)

In a large mixing bowl beat the softened cream cheese until it's fluffy. Add the pudding mix, milk and vanilla and beat until mixed well. Fold in the cool whip. Refrigerate the mixture to set for a few minutes while you do the next step.

In your serving bowl, line the bottom with a layer of vanilla wafers. On top of that add a layer of bananas.

Remove the pudding mixture from the fridge and carefully add a layer of pudding (about 1/3 of the mixture) in the serving bowl until the bananas are covered.

Add another layer of cookies and bananas. If you have a clear bowl you can line some cookies and/or banana slices around the walls of the bowl for decoration. Add the remaining pudding and banana slices.

Then start decorating the top! I went simple with just Nilla wafers broken in half, but you can use bananas, cookies, cool whip, strawberries, chocolate curls, etc.


Enjoy! And be sure to share!

Glossy Blonde
Related Posts Plugin for WordPress, Blogger...